Add Row
Add Element
American Yard and Home Logo
update
American Yard & Home
American Yard & Home Logo
update
Add Element
  • Home
  • Categories
    • Ask an Expert
    • DIY Projects & Repairs
    • Featured Businesses
    • Home Renovation & Remodeling
    • Interior Design & Styling
    • Landscaping & Curb Appeal
    • Outdoor Living
    • Smart Home & Tech
June 16.2025
2 Minutes Read

Mastering Concrete Anchor Installation: Avoid Common DIY Mistakes

Power drill in action on concrete slab for anchor installation tips.


Choosing the Right Concrete Anchors: A DIY Essential

When it comes to securing items to concrete surfaces, many homeowners struggle with the correct choice of anchors. As pointed out in the video You're Doing It Wrong! | Why Most Homeowners Fail With Concrete Anchors, the success of your DIY projects hinges on selecting the appropriate anchoring method. A staggering two out of ten respondents prefer using wedge anchors, while a surprising seven out of ten opt for Tapcons. However, the expert in the video recommends Simpson Strong Tie Titan HD anchors as the best option due to their superior grip and reliability.


In You're Doing It Wrong! | Why Most Homeowners Fail With Concrete Anchors, the discussion dives into the critical aspects of choosing the right concrete anchors, exploring key insights that sparked deeper analysis on our end.

The Importance of Proper Tools

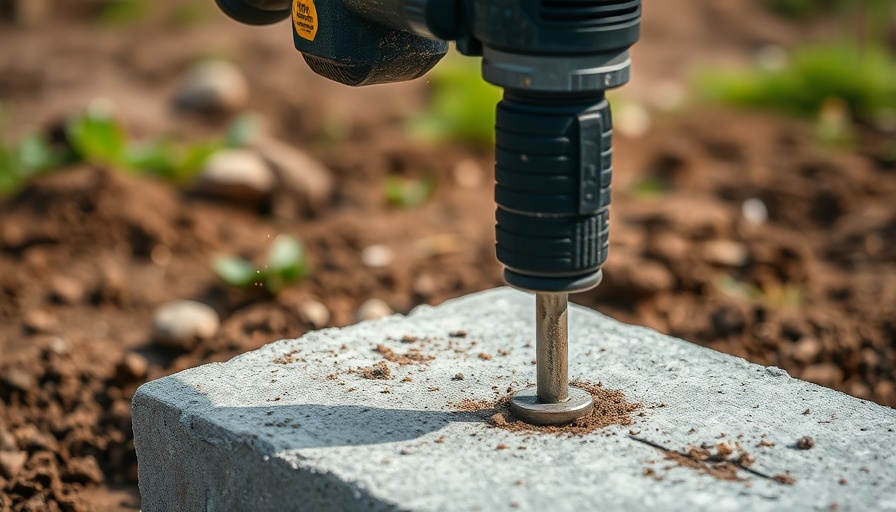
An effective DIY project requires the right tools. Many homeowners default to combination drills with hammer settings, which may work for a couple of holes, but for larger projects, a rotary hammer drill is essential. The video showcases a side-by-side comparison, illustrating that a rotary hammer drill can complete a job four times faster than a standard drill. Not only does this save time, but it also reduces effort and produces cleaner results — a vital aspect of achieving successful concrete fastening.

Keep It Clean: The Secret to Successful Anchoring

Beyond tools and anchors, methodical cleanliness is key. When drilling into concrete, leaving debris in the hole can lead to anchor failure. The video emphasizes vacuuming out the hole right after drilling to ensure a secure fit. This simple yet often overlooked step can significantly increase the longevity and strength of your concrete anchors.


DIY Projects & Repairs

Write A Comment

*
*
Related Posts All Posts
08.08.2025

Why August Is the Best Month for Exterior Painting and Home Repairs

Update August: The Optimal Time for Exterior Painting As the summer sun begins to dip, homeowners often think about outdoor projects before the cooler fall weather sets in. One of the most rewarding DIY projects you can undertake is painting the exterior of your home. August, in particular, provides ideal conditions for achieving a long-lasting paint job. The key lies in rates of humidity and temperature, both of which can significantly influence the outcome of your work.In #2540 – Exterior Painting Like a Pro | Stop Roof Leaks Before They Start | Water Heater Replacement, the discussion dives into essential home projects for this summer, exploring key insights that sparked deeper analysis on our end. Why Timing Matters in Home Renovation During late summer, average temperatures hover between 70°F and 85°F, maximizing the chances that the paint will cure perfectly—not too hot and certainly not too cold. This is crucial, as paint requires specific temperatures to fully adhere and dry without cracking or bubbling. Hence, if painting has been on your summer to-do list, now is the perfect time to roll up your sleeves. Preparation: The Secret to Success Every successful exterior painting job begins with preparation. Start by cleaning the surface of your home to remove dirt, mildew, and old, flaking paint. A gentle power wash often does the trick. Next, opting for a primer can significantly improve the durability of your paint's finish while enhancing its vibrancy. Choose a product that fits your specific exterior materials—like 100% acrylic latex paint for wood and vinyl surfaces—for optimal results. Staying Ahead of Home Repairs: The Importance of Roof Maintenance In home improvement discussions, many homeowners neglect the health of their roofs until they appear in dire need of attention. "A stitch in time saves nine," is especially applicable here. Regular roof check-ups can help catch small issues before they become costly repairs. Companies like RoofMax offer valuable roof tune-up services that can help maintain your roof's integrity while saving you money long-term. Water Heater Woes: When to Act Water heaters are often taken for granted—until things go wrong. If your system is over ten years old or showing signs like rust-colored water or unusual noises, it might be time for a replacement. There are energy-efficient options available today, including tankless models that can give you hot water on demand, potentially saving you money in the long run. Regular maintenance, such as flushing the tank annually, can extend the life of existing units. Take Action: Embrace the Season's Opportunities With the summer months winding down, this is an opportune moment to tackle those home improvement projects. Whether you're finally getting around to painting your house, checking in on your roof, or considering a water heater upgrade, staying proactive not only elevates your home's appearance and functionality but can also yield significant long-term savings. Don't wait for emergencies to prompt action; tackle these issues now and enjoy a fresh and functional living environment. Each step, no matter how small, contributes immensely to the maintenance and beauty of your home.

08.04.2025

How Modern Framing Tools Revolutionize Home Renovations

Update The Evolution of Framing Tools: A Look Back In the world of home improvement, there's nothing quite as satisfying as putting up a wall. As seen in A Personal History of Framing Tools, the art of framing has transformed significantly over the years. From using traditional wooden mallets and pegs to modern pneumatic framing guns, the industry has witnessed remarkable innovations that enhance both efficiency and accuracy. For homeowners embarking on renovation projects, understanding these tools is essential to improve project outcomes.In A Personal History of Framing Tools, the discussion dives into the evolution and impact of modern framing tools, exploring key insights that sparked deeper analysis on our end. Why Choose Modern Tools for Your DIY Projects? Homeowners might wonder why they should invest in modern framing tools. First and foremost, the speed and efficiency offered by pneumatic and battery-powered guns allow for quick completion of tasks. For example, in the video, it's illustrated how much faster framing can be when using air-powered tools as opposed to manual hammering techniques, which can be time-consuming and laborious. Adjustability and Versatility: Key Features Modern framing tools are not only faster; they also come equipped with features that enhance usability. Adjustable depth settings allow users to control how deeply a nail goes into the material, a valuable feature for different types of projects. This flexibility ensures that whether you’re building a shed or framing a room, your work can be precise and tailored to the specific needs of the job. Embracing Technology: A Step Towards Efficiency The development of battery-operated and gas-powered tools has revolutionized the framing process. These advancements mean that homeowners no longer need to rely solely on electrical cords or air compressors, making tools more portable and accessible for small projects or tight spaces. Embracing technological improvements can significantly enhance your DIY capabilities. Common Misconceptions About Framing Tools Despite the clear advancements, some homeowners remain hesitant to adopt modern tools due to misconceptions. One common myth is that such tools are only for professionals. In reality, many contemporary framing tools are designed with the DIY community in mind, allowing anyone to achieve professional-quality results with a bit of practice. Your Next Steps in Home Improvement Armed with knowledge of modern framing tools, homeowners can feel more confident taking on renovation projects. Whether framing a new room addition or updating existing ones, integrating these tools can lead to not only faster completion but also a more polished outcome. It's essential to explore the various tools available in stores or online, considering factors such as balance, weight, and ease of use before making a purchase. Educating oneself about the best practices for tool usage can also add to your skill set, ensuring that each project is a successful endeavor.

08.03.2025

Innovative Underbed Storage Drawer: A Step-By-Step DIY Guide

Update Maximizing Space: The Benefits of Underbed Storage As many homeowners know, finding innovative ways to maximize space is essential for clutter-free living. Underbed storage solutions have gained popularity for their ability to efficiently utilize often-neglected areas. Creating an underbed storage drawer, like the one showcased in the video, can not only help you organize your belongings but also create a tidier living space.In 'How to Make an Underbed Storage Drawer | House One | This Old House', the discussion dives into innovative storage solutions, exploring key insights that sparked deeper analysis on our end. Tools and Materials: What You Need to Get Started Before diving into your woodworking project, it’s essential to gather the right tools. For crafting an underbed storage drawer, you’ll need: 1x6 and 1x8 boards for the structure Plywood for the base Miter saw and circular saw for precise cuts A jig for drilling pocket holes Wood glue and screws for assembly With these materials on hand, you're ready to start building your drawer! A Step-by-Step Guide to Building Your Drawer Building the underbed storage drawer requires a few straightforward steps: Measure and cut your boards as directed by the provided cut list. Use a jig to drill pocket holes in the boards, ensuring you have secure joints. Assemble the box by attaching the back wall to the sidewalls using screws and glue. Create the drawer by attaching sides to the plywood bottom before securing the front. This hands-on approach not only empowers you with skills but also results in a functional and stylish underbed storage solution. Emotional Connection: The Joy of Creating a Personalized Space Beyond mere functionality, projects like this one provide a sense of accomplishment and personalization to your home. Crafting an item for your space allows you to tap into your creativity, providing both a practical benefit and a fulfilling experience. It also fosters a connection with your living environment, making it feel truly yours. Explore More DIY Projects If you're intrigued by the idea of building your own furniture and storage solutions, consider exploring more do-it-yourself projects. From organizing your garage to revamping your living room, This Old House offers a wealth of resources to inspire your next project. Creating a welcoming space for you and your family is within reach! To dive deeper into your home improvement journey, check out more videos and tutorials available at This Old House. Their wealth of information can turn your household dreaming into reality, making even novice DIYers feel confident in their creations.

Terms of Service

Privacy Policy

Core Modal Title

Sorry, no results found

You Might Find These Articles Interesting

T
Please Check Your Email
We Will Be Following Up Shortly
*
*
*