Did you know that up to 60% of gardeners miss out on early spring crops simply because they don’t plant in December? If you’re eager for a bountiful garden come early spring, now is the perfect time to rethink your winter gardening strategy. Starting your winter garden in December isn’t just possible—it’s the secret to unlocking a fresh, health-boosting harvest weeks before most gardeners even turn their soil. Let’s break down which December vegetables to plant will thrive in the cold and how even a chilly climate can become your garden’s greatest asset. Start Your Winter Garden Now: Surprising Facts About December Vegetables to Plant
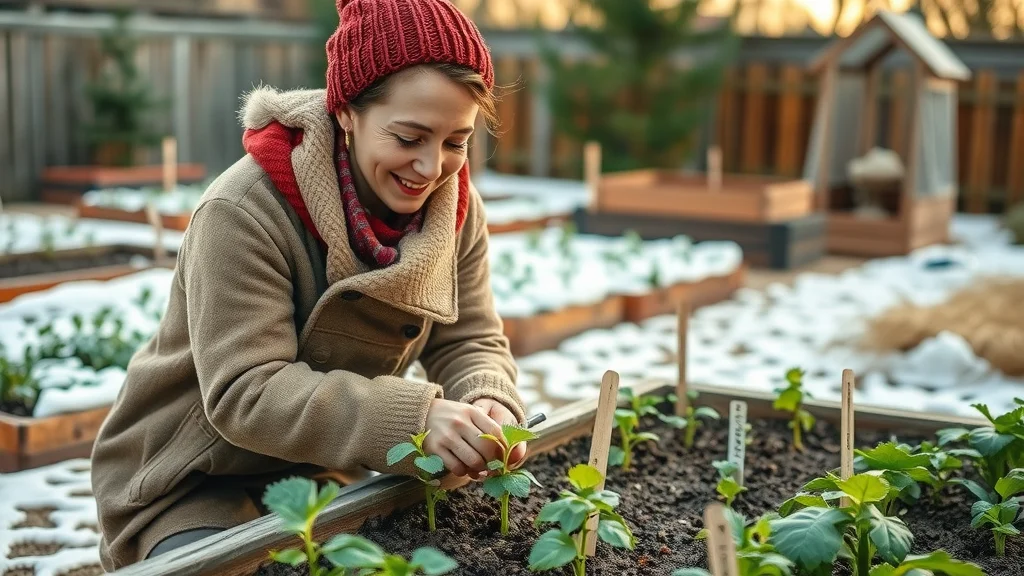
Many gardeners assume winter means a gardening break, but seasoned growers know December is the perfect time to jumpstart your early spring harvest. By understanding which December vegetables to plant, you can transform your garden beds—even the ones under a dusting of snow—into productive spaces ready to burst into life as soon as winter breaks. In fact, experts highlight that gardeners in almost every growing zone can benefit from winter sowing, as cold-hardy crops tolerate cool weather and even thrive when direct sown into prepared beds or grown under simple covers like row covers or cold frames. Don’t let another year go by with empty winter beds—embrace the winter long planting window, protect your young plants, and enjoy early, healthy harvests before your neighbors have even started tilling. Planting in December isn’t just for those in a warmer climate. Gardeners from temperate to colder regions can leverage hardy varieties, season extension techniques, and a touch of boldness. Recent data suggests up to half of a year’s success in the vegetable patch hinges on planting decisions made during these winter months. Whether you have a backyard garden bed, a sunny windowsill, or raised beds laced with mulch, planting now transforms those chilly days into the most productive time of year for your garden. When planning your winter garden, it's also important to consider how your garden's infrastructure can impact plant health. For example, ensuring your garden beds and nearby structures are protected from excess moisture can prevent root rot and other issues. If you're interested in safeguarding your home and garden from water damage, you might find these key strategies for waterproofing your concrete foundation especially useful during the wet winter months. What You’ll Learn About December Vegetables to Plant for Early Spring The best types of vegetables to plant in December for early spring harvests
How climate zone affects your winter garden choices
Step-by-step planting guides for each recommended vegetable
Top techniques to protect new crops from harsh weather
Common mistakes and how to avoid them Why Plant in December? Benefits and Considerations for Your Winter Garden You might wonder, “Why not wait until spring?” The answer is simple: planting in December gives your garden a jumpstart before competitors—whether that’s other gardeners or the unpredictable early spring weather. Cold season crops grow stronger roots, adapt to chilly conditions, and are often less troubled by pests. Winter-hardy vegetables are specifically bred to withstand frosts or periods of dormancy, which means their seeds can be direct sown even in cold soil and protected with simple techniques like row covers or cold frames. "The secret to robust spring harvests often starts with what you plant in December." – Expert Gardener By planting in December, you create a staggered harvest calendar, ensuring your first leafy greens, root vegetables, and alliums are ready to pick before the majority of gardeners have even bought their seeds. With a bit of preparation—like mulching garden beds and using windbreaks—you can turn the quietest gardening period into the most rewarding, and stay healthy with early, nutrient-packed vegetables. Key Factors for December Vegetable Planting Success Soil preparation tips for winter garden beds: Work in organic compost and loosen compacted soil before the ground freezes. Raised beds and well-draining garden soil prevent waterlogging and encourage root development even in winter months.
Using row covers and mulch to protect seedlings: Row cover is vital for temperature moderation, while organic mulch retains warmth and moisture, keeping seedlings hydrated but not soggy.
Selecting varieties adapted to cooler temperatures: Opt for hardier seed types—like mixed Asian greens, true winter spinach, or overwintering onion sets—to ensure strong cold resistance.
Managing moisture and drainage through winter: Water sparingly; cool-weather crops need less moisture and hate wet feet. Cold frames or mini poly tunnels can guard against excessive winter wetness and frost.
When to start planting based on your USDA Hardiness Zone: Northern gardeners may need to use cold frames or plant a couple of weeks earlier, while a warmer climate allows for direct sowing late into December. 8 Best December Vegetables to Plant for a Productive Early Spring
1. Asian Greens: Plant in December for Crisp Early Spring Salads Asian greens such as bok choy, mizuna, and tatsoi are superstars among December vegetables to plant. These leafy green vegetables thrive in cool weather and will germinate in chilly soils, making them ideal for direct sowing in garden beds or under grow lights on a sunny windowsill. They establish quickly and grow steadily despite short winter days, setting you up for crispy, nutritious salads long before other crops are in. Their cold resistance makes them perfect for growing under cover, such as with row cover or inside cold frames, where even a light frost will not deter early spring harvests. Plus, these greens offer the flexibility of cut-and-come-again harvesting, meaning you can pick outer leaves all winter long to stay healthy and enjoy a steady supply of greens. 2. Spinach: A Cold-Hardy Winter Garden Staple One of the most cold hardy vegetables to plant in December is spinach. Spinach seeds not only survive but germinate quickly when soil temperatures are just above freezing. This resilient leafy green can grow throughout the winter under a layer of straw mulch or lightweight row cover, rewarding December gardeners with a nutrient-dense crop as soon as the temperature lifts in early spring. Spinach thrives in both cold frames and open beds, making it flexible for home gardeners in varying climates. With rich vitamin content and crisp texture, spinach remains sweet and tender after repeated frosts—making it a must for any winter garden aiming for a productive jumpstart. 3. Garlic: Plant in December for Bigger Bulbs by Early Spring Garlic is the classic choice when considering which December vegetables to plant. It requires chilling to form large, robust bulbs, so planting in December is ideal—even if your soil is cold or lightly frozen. Plant cloves directly into the garden bed about two inches deep, then cover with 3-4 inches of straw mulch for winter-long protection. Garlic doesn’t need much attention over winter, but come spring, it will burst into life, giving you the perfect first harvest of plump, aromatic bulbs—a reward for your seasonal planning. If you plant garlic now, you’ll enjoy scapes and mature bulbs before summer heat sets in! 4. Onions: Get a Head Start for a Sweeter Early Spring Harvest Planting onions in December means you’ll have bigger, sweeter bulbs ready to harvest before most gardeners even think to sow seeds. Overwintered onions have a chance to develop strong root systems and establish themselves during cool weather. Whether you prefer seed or dormant sets, start them in well-drained, compost-enriched soil, then protect with a row cover or an extra layer of mulch. Onions are adaptable—try short-day varieties if you’re in a warmer climate, or traditional ones for northern gardens. With a little planning, you’ll be rewarded with a flavorful and satisfying early harvest. 5. Peas: Early December Sowing for Early Spring Pods Peas are another excellent option among December vegetables to plant, especially for those in temperate or slightly warmer climates. Sowing peas early allows their roots to dive deep ahead of spring, ensuring strong, healthy vines once the weather warms. Use a cold frame or place a row cover over sown beds for added protection in colder areas. Keep an eye on moisture—peas don’t like to sit in wet, heavy soil, so well-amended, drained garden beds are best. Once the thaw comes, you’ll enjoy a flush of early pods, ideal for fresh eating or spring stir-fries. 6. Broad Beans: Hardy Legumes for the Winter Garden Looking to enrich your soil while harvesting nutritious pods early? Broad beans are one of the hardiest legumes and a rewarding winter crop. These cold season champions are unfazed by freezing temperatures, making them a top pick for December planting. Sow seeds in beds amended with compost and cover with straw mulch or row cover for extra protection. Besides reliable early spring harvests, broad beans boost soil nitrogen, making them beneficial for crop rotation. Plant these now, and your winter garden will repay you with vigorous, tall plants that set the stage for an abundant season. 7. Carrots: Sweeten Up Winter Garden Beds with a December Sowing Carrots sown in December may be slow to germinate, but come early spring, they’ll reward you with extra-sweet, crunchy roots. Protected garden beds or cold frames provide just enough insulation to keep carrot seedlings safe through frost, while the cold actually enhances their flavor. To succeed, choose a hardy variety suited to winter growing, and sow seeds directly into deeply loosened, well-amended soil—then cover the bed with a layer of mulch or use a plastic cold frame for warmth. As winter retreats, early carrot tops will signal a harvest that's earlier—and tastier—than spring-sown crops. 8. Kale and Collards: Nutrient-Packed Greens for Year-Round Harvests For year-round nutrition, kale and collards can’t be beaten. These leafy greens not only survive the coldest months but actually improve in flavor and texture when touched by frost. Planting in December means they’ll establish during the mild early winter and rocket skyward after the first thaws, giving you an abundant supply of vitamins and minerals through spring. Use mulch to protect roots and row cover to shield young seedlings from wind and ice. Harvest outer leaves regularly, and your plants will produce tender greens winter long—perfect for soups, salads, and sautés. Table: Quick Reference Guide—December Vegetables to Plant and Their Benefits Vegetable
Days to Harvest
Ideal Climate
Winter Protection Needed
Key Benefits Asian Greens
30-50
All*
Row Cover
Quick Yield Spinach
40-55
All
Mulch
Cold Hardy Garlic
90-120
All
Mulch
Flavorful Bulbs Onions
120-160
All
Row Cover
Sweetness Peas
60-80
Warmer Climate
Mulch
Early Pods Broad Beans
80-90
All
Mulch
Soil Nitrogen Carrots
60-80
All
Cold Frame
Sweet Roots Kale/Collards
60-90
All
Mulch
Tender Greens Best Practices: How to Protect December Vegetables to Plant from Winter Extremes Choose locations with windbreaks for your winter garden to shield delicate seedlings from cold blasts and frost heaving.
Apply mulch or row covers to regulate temperature swings, retain moisture, and insulate the soil. Lightweight row covers let in light while keeping pests and icy winds out.
Water only during dry winter spells, and avoid overwatering, as cold, saturated soil can cause roots to rot.
Check for pests regularly—even in winter, slugs and aphids may take shelter under mulch or covers.
Harvest frost-touched leaves (like kale and collards) for best flavor, as cold weather sweetens many leafy greens and root crops. Watch this step-by-step guide highlighting the most resilient December vegetables to plant and see winter garden preparation in action. From prepping soil and planting garlic to protecting young plants with row covers and tracking early spring growth, you’ll see firsthand tips that make cold-season gardening a breeze. Common Questions About December Vegetables to Plant (FAQs)
What is the best vegetable to plant in December? Spinach, garlic, and Asian greens are considered among the best December vegetables to plant because of their robust cold resistance and capacity for quick, abundant yields as soon as warmer days return. These crops are perfectly suited for direct sowing or growing under basic protection, reliably bringing your earliest harvests every year. What is the 70/30 rule in gardening? The 70/30 rule is a time-tested gardening practice recommending you focus 70% of your planting space on staple, reliable crops—like spinach, garlic, and onions—while dedicating 30% to experimental or specialty varieties such as Asian greens or unusual root crops. This strategy maximizes garden productivity during the winter months while keeping things exciting and diverse. What is the best crop to plant in December? Garlic is the standout single crop to plant in December. Its requirement for winter chilling sets it apart—cloves planted now develop into full heads packed with flavor, ready for harvest ahead of most spring-sown vegetables. Can I plant vegetables in December? Absolutely! Many cold-hardy and resilient crops—such as spinach, kale, garlic, and onions—can be planted even as temperatures drop. With a bit of planning, use of mulch, and simple covers, you’ll enjoy early salad greens, roots, and bulbs weeks ahead of traditional planting schedules. Key Takeaways: Maximizing Your Early Spring Harvest with December Vegetables to Plant December planting sets the stage for earlier, healthier crops in spring
Asian greens, spinach, and garlic top the list for winter gardens
Proper protection and soil preparation are vital to winter gardening success
Even those in colder zones can enjoy productive early spring harvests Ready to Get Growing? Download Our Free Winter Planting Calendar for December Vegetables to Plant Seize the season—download our Winter Planting Calendar and start your December vegetables to plant for a lush, rewarding early spring garden! Start planting early, protect your crops, and let your winter garden work wonders—by spring, you’ll be harvesting when everyone else is still sowing. As you prepare your garden for a productive winter and early spring, remember that a thriving landscape is built on a strong foundation—both literally and figuratively. Beyond planting strategies, safeguarding your home’s structure from seasonal moisture is just as important for long-term success. For a deeper dive into protecting your property and ensuring your garden’s environment remains healthy year-round, explore these essential homeowner tips for concrete foundation waterproofing. Taking a holistic approach now will help you enjoy not only a flourishing garden but also peace of mind as the seasons change. Planting vegetables in December can set the stage for a productive early spring harvest. By selecting cold-hardy crops and employing appropriate protection methods, you can enjoy fresh produce weeks before the traditional growing season begins.
1. Asian Greens: Plant in December for Crisp Early Spring Salads
Asian greens such as bok choy, mizuna, and tatsoi are excellent choices for December planting. These leafy vegetables thrive in cool weather and can be direct-sown into prepared beds or grown under simple covers like row covers or cold frames. They establish quickly and grow steadily despite short winter days, providing nutritious salads long before other crops are ready. Their cold resistance makes them perfect for growing under cover, where even a light frost will not deter early spring harvests. Additionally, these greens offer the flexibility of cut-and-come-again harvesting, allowing you to pick outer leaves throughout the winter. (gardeningknowhow.com)
2. Spinach: A Cold-Hardy Winter Garden Staple
Spinach is one of the most cold-hardy vegetables to plant in December. Its seeds can germinate in chilly soils, making it ideal for direct sowing in garden beds or containers. This resilient leafy green can grow throughout the winter under a layer of straw mulch or lightweight row cover, rewarding gardeners with a nutrient-dense crop as soon as temperatures rise in early spring. Spinach thrives in both cold frames and open beds, making it flexible for home gardeners in varying climates. With rich vitamin content and crisp texture, spinach remains sweet and tender after repeated frosts, making it a must for any winter garden aiming for a productive jumpstart. (gardeningknowhow.com)
3. Garlic: Plant in December for Bigger Bulbs by Early Spring
Garlic is a classic choice for December planting. It requires a chilling period to form large, robust bulbs, so planting in December is ideal, even if your soil is cold or lightly frozen. Plant cloves directly into the garden bed about two inches deep, then cover with 3-4 inches of straw mulch for winter-long protection. Garlic doesn’t need much attention over winter, but come spring, it will burst into life, giving you the perfect first harvest of plump, aromatic bulbs—a reward for your seasonal planning. If you plant garlic now, you’ll enjoy scapes and mature bulbs before summer heat sets in. (gardeningknowhow.com)
4. Onions: Get a Head Start for a Sweeter Early Spring Harvest
Planting onions in December means you’ll have bigger, sweeter bulbs ready to harvest before most gardeners even think to sow seeds. Overwintered onions have a chance to develop strong root systems and establish themselves during cool weather. Whether you prefer seed or dormant sets, start them in well-drained, compost-enriched soil, then protect with a row cover or an extra layer of mulch. Onions are adaptable—try short-day varieties if you’re in a warmer climate, or traditional ones for northern gardens. With a little planning, you’ll be rewarded with a flavorful and satisfying early harvest. (gardeningknowhow.com)
5. Peas: Early December Sowing for Early Spring Pods
Peas are another excellent option for December planting, especially for those in temperate or slightly warmer climates. Sowing peas early allows their roots to dive deep ahead of spring, ensuring strong, healthy vines once the weather warms. Use a cold frame or place a row cover over sown beds for added protection in colder areas. Keep an eye on moisture—peas don’t like to sit in wet, heavy soil, so well-amended, drained garden beds are best. Once the thaw comes, you’ll enjoy a flush of early pods, ideal for fresh eating or spring stir-fries. (gardeningknowhow.com)
6. Broad Beans: Hardy Legumes for the Winter Garden
Looking to enrich your soil while harvesting nutritious pods early? Broad beans are one of the hardiest legumes and a rewarding winter crop. These cold-season champions are unfazed by freezing temperatures, making them a top pick for December planting. Sow seeds in beds amended with compost and cover with straw mulch or row cover for extra protection. Besides reliable early spring harvests, broad beans boost soil nitrogen, making them beneficial for crop rotation. Plant these now, and your winter garden will repay you with vigorous, tall plants that set the stage for an abundant season. (gardeningknowhow.com)
7. Carrots: Sweeten Up Winter Garden Beds with a December Sowing
Carrots sown in December may be slow to germinate, but come early spring, they’ll reward you with extra-sweet, crunchy roots. Protected garden beds or cold frames provide just enough insulation to keep carrot seedlings safe through frost, while the cold actually enhances their flavor. To succeed, choose a hardy variety suited to winter growing, and sow seeds directly into deeply loosened, well-amended soil—then cover the bed with a layer of mulch or use a plastic cold frame for warmth. As winter retreats, early carrot tops will signal a harvest that’s earlier—and tastier—than spring-sown crops. (gardeningknowhow.com)
8. Kale and Collards: Nutrient-Packed Greens for Year-Round Harvests
For year-round nutrition, kale and collards can’t be beaten. These leafy greens not only survive the coldest months but actually improve in flavor and texture when touched by frost. Planting in December means they’ll establish during the mild early winter and rocket skyward after the first thaws, giving you an abundant supply of vitamins and minerals through spring. Use mulch to protect roots and row cover to shield young seedlings from wind and ice. Harvest outer leaves regularly, and your plants will produce tender greens all winter long—perfect for soups, salads, and sautés. (gardeningknowhow.com)
By incorporating these vegetables into your December planting schedule, you can enjoy a diverse and nutritious harvest in early spring. Remember to consider your local climate and provide appropriate protection to ensure the success of your winter garden.
 Add Row
  Add
Add 


Write A Comment