 Add Row
  Add
Add 


Did you know that nearly 50% of American households experience clogs related to garbage disposals each year? This startling statistic highlights just how common kitchen plumbing woes can be. If you’ve ever battled a slow-draining sink or struggled with post-dinner cleanup, installing a garbage disposal could be your game changer. In this guide, we’ll explore how the right disposal unit can eliminate clogs, streamline food waste management, and transform your kitchen into an efficient, eco-friendly haven.
Shocking Truth: How Many Homes Suffer from Garbage Disposal Issues?
Did you know that nearly 50% of American households experience clogs related to garbage disposals each year?
Kitchen clogs and drainage problems aren’t rare—they’re an everyday struggle for many families. With millions of garbage disposals installed across the United States, approximately half encounter some type of issue annually, whether it’s due to improper use, old units, or simply taking on tough food waste. These statistics underscore the importance of choosing and maintaining the right disposal unit for your needs.
The most frequent issues reported involve overloaded disposal units, unsuitable food scraps (like fibrous vegetables or grease), and worn-out internal components. When a garbage disposal unit becomes inefficient, it’s not just a minor inconvenience—it can lead to persistent plumbing headaches, foul kitchen odors, and unexpected repair costs. By understanding the root causes and solutions, you can keep your kitchen running efficiently year-round.
Why Garbage Disposals Are a Must-Have for Every Modern Kitchen

- Reduces kitchen waste efficiently
- Keeps drains free of food waste
- Saves time on cleanup
A garbage disposal isn’t just a trendy kitchen upgrade—it’s a core component for any household seeking less mess and fewer maintenance hassles. By breaking down food waste directly beneath your sink, a disposal unit saves you the trouble of scraping every plate into the trash and prevents most food scraps from clogging your drains. This means no more frequent plumbing calls or surprise blockages mid-dinner prep.
In addition to convenience, modern garbage disposals help reduce the amount of waste that ends up in landfills. They’re engineered for durability, tackling tough food scraps with ease and sending them safely to water treatment plants where they can be handled more sustainably. With features like noise reduction and advanced grinding chambers, today’s top disposal units make easy work of food waste management and are more reliable than ever before.
How garbage disposals prevent clogged drains
One of the biggest perks of installing a garbage disposal is its ability to prevent clogged drains caused by food scraps. Instead of forcing large, tough food bits into your pipes where they can stick and build up over time, a disposal unit safely grinds waste into tiny particles. This lets them flow easily with water through the pipe system, all the way to the municipal treatment plant or your home’s septic system.
Some models, like the batch feed garbage disposal , offer added protection against accidental jams by requiring a cover control for each activation. Others, such as continuous feed units, work as long as the switch is engaged, quickly tackling bigger piles of kitchen waste. Whichever style you choose, the outcome is the same: pipes stay clear, garbage bags stay lighter, and kitchen cleanup becomes plain sailing.
Environmental benefits of owning garbage disposals
Owning a modern garbage disposal provides environmental advantages beyond convenience. By redirecting food waste from landfills—where it would otherwise generate methane, a potent greenhouse gas—disposal units help cities fight climate change. Once ground up, food waste travels with wastewater to treatment plants, often being converted into energy or fertilizer.
Additionally, as more treatment plants invest in energy recovery processes, the food waste you send down your disposal can become a valuable resource. By using a garbage disposal responsibly, you’re not only protecting your home but contributing to a greener, more resource-efficient community.
What You’ll Gain by Understanding Garbage Disposals
- Insight into top garbage disposal units on the market
- Knowledge about the features that fit your needs
- Understanding key differences: continuous feed vs. batch feed garbage disposal
- Advice on installation, maintenance, and pricing
Deciphering the world of garbage disposals empowers you to save money and avoid headaches. Knowing the difference between key features, understanding power cord compatibility , and recognizing which type of feed garbage disposal fits your lifestyle makes shopping for a new unit far less daunting. This guide highlights the best rated disposal units, demystifies their technology, and provides proven tips for installation and maintenance—so you can make a confident investment in your kitchen.
Understanding Garbage Disposals: Types and Technology
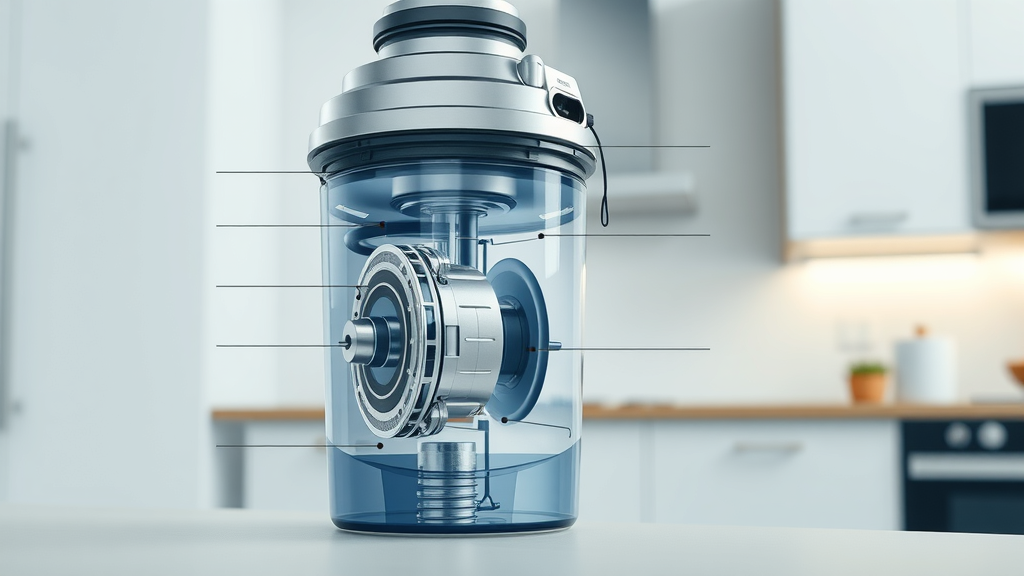
Key components of a garbage disposal unit
At their core, all garbage disposal units share a few essential parts: a grinding chamber for food waste, a high-speed rotor or impeller plate, a reliable power cord, and sometimes stainless steel components for extra durability. When you flip the switch, the induction motor whirls the impellers, pulverizing food waste against a stationary ring in seconds. The resulting particles quickly mix with water and are flushed away.
Some advanced models feature multiple grinding stages, sound insulation to reduce noise, and anti-jam mechanisms. Stainless steel parts in the grinding chamber ensure your disposal unit resists corrosion from wet, acidic food waste—and easy-to-replace power cords provide extra safety and convenience for installation and repairs.
Continuous feed garbage disposal vs. batch feed garbage disposal
Continuous feed garbage disposals are activated with a wall switch, working as long as the power stays on. This is the most popular style in American homes due to its practicality and speed, allowing users to toss in food scraps while running water keeps everything moving. However, the open operation does mean users must be careful to keep utensils, fingers, and small items out during use.
Batch feed garbage disposals, on the other hand, require a special magnetic or mechanical cover to operate. Only when the cover is securely in place will the disposal run, reducing the risk of accidents. While this system may be less convenient for busy cooks, it's ideal for families, apartment dwellers, or anyone seeking greater peace of mind. Both types come in varying motor strengths and chamber capacities, ensuring a fit for every home.
| Type | Operation | Pros | Cons |
|---|---|---|---|
| Continuous Feed | Operates while switch is on | Convenient, handles large volumes | May pose safety hazard |
| Batch Feed | Activated by cover | Safer for families | Less convenient |
How Garbage Disposals Work: Inside the Disposal Unit
Step-by-step breakdown of garbage disposal operation
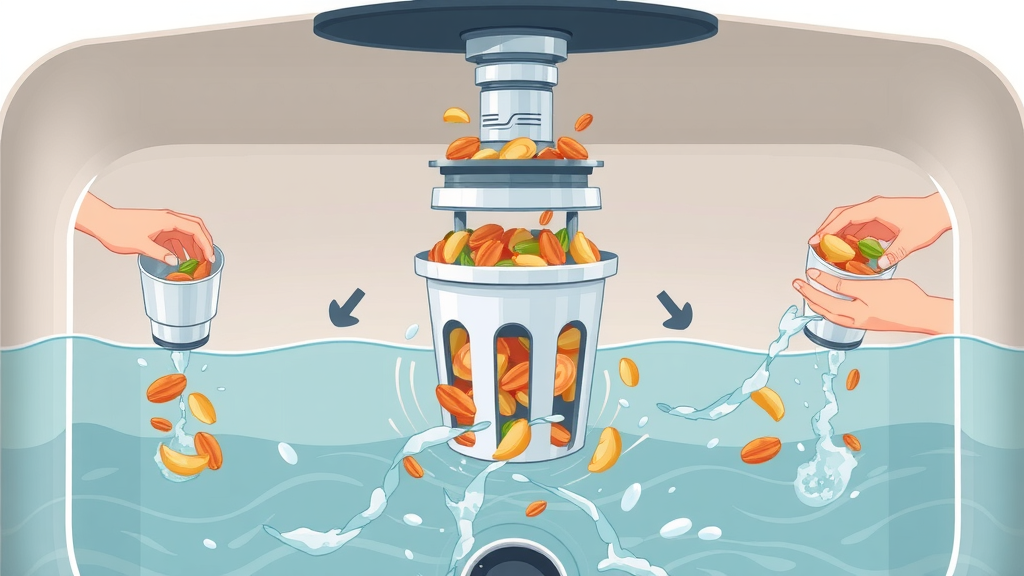
Here’s what happens each time you turn on your garbage disposal :
- Food scraps are swept into the disposal opening under the sink while a steady stream of cold water flows.
- The induction motor engages, spinning the internal plate and impellers at high speed. Food waste is forced against the grinding ring, quickly broken into finer particles.
- Once processed, the water carries the waste through the pipes and out to the main sewage system or septic system for proper treatment.
Thanks to this stepwise approach, tough food is safely dispatched with minimal risk to your plumbing. Most disposal units recommend using cold water, which helps solidify grease so it’s chopped up more efficiently and doesn’t clog your pipes.
Role of the power cord and motor in garbage disposals
The power cord is the lifeline of your garbage disposal unit . It connects the induction motor to your home’s electricity supply, powering the grinding mechanism. Whether you’re replacing an old disposal or installing a new one, be sure the power cord is compatible and safely connected. Most modern units either come with a pre-installed cord or allow easy plug-and-play solutions.
The induction motor is engineered for consistent, high-torque operation. It's what gives your disposal the power to conquer tough food and challenging food scrap loads. Maintenance of the power cord and regular checks for loose wires ensure uninterrupted, safe use. Brands like InSinkErator, Moen, and Waste King have refined these internal systems, making today’s disposal units more dependable than ever before.
Top-Rated Garbage Disposals: Product Comparison and Reviews
Leading brands and models
Choosing the right garbage disposal starts with reviewing trusted brands and top-selling models. InSinkErator is renowned for its powerful Evolution Excel, a favorite in bustling kitchens for its 1 HP motor and continuous feed design. Moen’s GX Series stands out for whisper-quiet operation, while Waste King’s L-8000 remains a go-to for value-seekers wanting superior grinding at an affordable price point.
| Brand | Model | Horsepower | Feed Type | Price | Customer Rating |
|---|---|---|---|---|---|
| InSinkErator | Evolution Excel | 1 HP | Continuous | $350 | 4.8/5 |
| Moen | GX Series | 3/4 HP | Continuous | $220 | 4.5/5 |
| Waste King | L-8000 | 1 HP | Continuous | $130 | 4.6/5 |
Feature comparison: batch feed, continuous feed, and power cord options
Each model offers distinct advantages depending on your kitchen’s needs. Continuous feed disposals are better for active homes, allowing you to continually add waste without stopping to reset the unit. Batch feed models introduce safety by only running when the cover is locked in place—a smart pick for families with children.
Another detail not to overlook is the power cord . Some units are sold without a cord, which means purchasing one separately and ensuring compatibility during installation. Others feature easy-install cords, a boon for quick kitchen upgrades. Assess these differences alongside horsepower, chamber size, and price to find the unit that aligns with your household’s volume and pace.
Key Features to Consider When Buying Garbage Disposals
- Horsepower: 1/2 HP vs 3/4 HP and more
- Noise reduction technology
- Food waste grinding chamber size
- Safety components in disposal units
Picking the right garbage disposal unit involves more than just price. For light to moderate use, a 1/2 HP model might suffice. Daily cooks or large families, however, should opt for 3/4 HP or even a 1 HP unit to handle heavier loads and tougher foods. Advanced grinding stages can improve reliability, while stainless steel parts extend unit life and resist corrosion.
Noise is another major consideration. Brands like Moen and InSinkErator frequently lead with technology that minimizes grinding sounds, keeping the kitchen atmosphere peaceful even during heavy cleaning sessions. Look for safety features such as overload protection, auto-reverse functions to avoid jams, and integrated baffles that contain water spray and particles.
Importance of power cord compatibility
Power cord compatibility can make or break your installation experience. Some garbage disposals come “cord-ready,” while others need a separate cord kit. Always confirm the electrical specs before purchase and seek UL-listed, heavy-duty cords for safety. If updating an old disposal unit, double-check that your replacement’s wiring and plug style fit the existing outlet below the sink.
Investing in compatible, high-quality cords ensures stable operation and reduces risk of shorts or electrical failures down the road. For DIY enthusiasts, pre-wired options can accelerate setup. If you’re not familiar with electrical work, however, always consult a professional installer to guarantee safety.
Benefits of Garbage Disposals: Why They Matter

Saving money and reducing food waste
Efficient garbage disposals curb food waste by allowing every bit of organic material to be broken down quickly and safely. Rather than filling trash bags with heavy, wet leftovers—making them prime targets for leaking and pests—food scraps are sent directly to the water treatment plant for eco-friendly processing. This not only lightens your household’s environmental footprint but also lowers your overall waste management costs.
Many users report that adding a modern disposal unit cuts their trash in half, easing curbside pickup fees and preserving landfill space. If you aim to live greener, integrating a top-rated garbage disposal unit is a step toward everyday sustainability.
Simplified kitchen cleanup with garbage disposals
One of the top benefits of garbage disposals is the streamlining of your kitchen routine. With food waste casually swept into the grinding chamber, there’s less mess on countertops and fewer unpleasant odors from lingering scraps. This means faster cleanup after meals, especially during big gatherings or busy weeknights.
Cooking also becomes less of a chore without the worry of overflowing garbage cans or smelly scraps stuck in the trash overnight. With premium continuous feed garbage disposals, you can stay focused on what matters—enjoying meals, family, and relaxation.
Eco-friendly impact of garbage disposal units
Disposal units promote sustainability by diverting vast amounts of organic matter from landfills. Food waste processed in these systems can be converted at municipal wastewater treatment plants into biogas, compost, or energy, turning a home convenience into a genuine community benefit.
Forward-thinking brands have also improved energy efficiency and water usage, making today’s top models both eco-friendly and cost-effective. Using a disposal unit responsibly contributes to cleaner water systems and a more balanced urban ecology.
Installation and Maintenance Tips for Your Garbage Disposal Unit
How to install a garbage disposal: step-by-step guide
While professional installation is always an option, many homeowners can tackle garbage disposal unit installation themselves with the right tools and instructions. Begin by disconnecting power to prevent accidents, then remove the old disposal or sink strainer. Attach the new mounting ring and connect the unit securely below the sink, ensuring all gaskets and seals are tight to prevent leaks.
Connect the power cord , following manufacturer instructions, and hook up the discharge pipe to the drain system. Test the disposal with cold water running to check for tightness and listen for smooth, unobstructed operation. If in doubt, consult a licensed plumber.
Routine maintenance: keeping food waste out of trouble
- Use cold water during operation
- Clean with ice and baking soda
- Regular power cord checks
Maintaining your garbage disposal ensures it lasts and performs at its best. Always run cold water before, during, and after disposal use to help flush particles thoroughly and prevent fats and oils from liquefying in the pipes. For routine cleaning, grinding a handful of ice cubes helps scour internal components while deodorizing with baking soda and citrus peels can tackle lingering smells.
Be sure to periodically inspect the power cord and electrical connections for wear or damage. This is especially important in older homes and with frequent machine use. Following a simple care routine prevents jams, rust, and foul odors from taking over your kitchen.
Troubleshooting Common Garbage Disposal Issues
How to fix clogs and jams in garbage disposal units

Clogs or jams can strike any garbage disposal, especially after large meals or when tough food enters the chamber. To address these problems, first cut the power at the breaker or unplug the unit. Use the “reset” button typically found at the bottom of the disposal. For stubborn jams, insert a hex wrench into the slot on the underside of the unit and manually rotate the impeller to free stuck objects.
Never put your hands inside the disposal chamber, even if the power is off. Use tongs or pliers to retrieve troublesome food waste or objects blocking the system. If jams persist after these steps, it may mean internal parts are worn and replacement or professional help is needed.
When to replace vs. repair your garbage disposal
Not every garbage disposal issue requires a replacement. Common signs that a repair may suffice include jams that clear with reset or manual intervention, leaks from loose gaskets, or minor electrical hiccups from worn cords. However, if you encounter frequent unresolvable jams, persistent leaks, grinding noises, or slow performance despite maintenance, your disposal may be nearing the end of its lifespan.
Most modern units are designed for up to 10-12 years of continuous use, but heavy-duty kitchens or improper usage can shorten this window. Always consider the cost of repairs versus the benefits and features of a new disposal unit before making a decision.
People Also Ask: Comprehensive Answers on Garbage Disposals
What is the best garbage disposal to purchase?
The best garbage disposal depends on your household’s needs, frequency of use, and budget. The InSinkErator Evolution Excel, for example, excels in power, noise reduction, and grinding performance, while the Waste King L-8000 offers excellent value for money. Families may prefer batch feed models for safety, while serious cooks might seek larger continuous feed units with higher horsepower.
How long do garbage disposals typically last?
Most quality garbage disposals are built to last 8 to 12 years with regular use and proper maintenance. Units featuring stainless steel grinding components and advanced anti-jam technology can often outlast basic models. Regularly cleaning your disposal and addressing issues early can help maximize its lifespan.
Should I get a 1/2 or 3/4 hp garbage disposal?
For small households or minimal use, a 1/2 horsepower disposal may be adequate. However, most experts recommend a 3/4 HP model or higher for typical families, especially if you frequently cook or entertain. The additional power handles tougher food waste and ensures smoother operation with fewer clogs or jams.
How much should I pay for a garbage disposal?
Prices for garbage disposals vary widely depending on brand, power, features, and type. Entry-level models may start at around $65, while premium units like the InSinkErator Evolution Excel can run up to $400. Mid-range options with balanced power and noise control generally cost between $120 and $220. Always include potential installation costs when budgeting for your new unit.
Sustainability: Food Waste Management and Garbage Disposals

How garbage disposal units help reduce landfill waste
Garbage disposal units offer a simple yet powerful way to cut down on municipal landfill contributions. By diverting organic waste from the trash stream to local water treatment facilities, they help transform food scraps into renewable energy or compost—resources needed by modern cities. This not only saves landfill space but also shrinks your home’s carbon footprint.
Some treatment sites in the United States now rely on captured food waste as a renewable energy source, generating power and reducing the need for fossil fuels. Using a disposal unit responsibly ensures more food waste is repurposed, rather than decomposing and producing methane at the dump.
Integrating garbage disposals with composting systems
While garbage disposals handle most food waste efficiently, combining a disposal unit with a home composting program is the gold standard for environmentally conscious households. Use the disposal for meat, dairy, and cooked food scraps (which don’t break down well in compost), and set aside vegetable peels or coffee grounds for your compost bin.
Many eco-minded homeowners find this combined approach offers the best of both worlds: less household waste, healthier soil in their gardens, and a cleaner, greener kitchen overall. Some municipalities even encourage this two-pronged system to keep organic waste out of landfills entirely.
Expert Insights: Real Customer Reviews on Garbage Disposal Performance
"Our new garbage disposal has changed the way we handle waste—no more clogs, and less trash overall!" – Verified Homeowner Review
Customer experiences with continuous feed garbage disposals
Continuous feed garbage disposals consistently earn praise for their convenience and ability to handle large meal cleanups. Many customers appreciate never having to stop and reset the unit, noting that their continuous feed garbage disposal makes kitchen prep and cleanup much faster. Minor cautions include staying alert to avoid dropping utensils into the chamber while in use.
Batch feed fans, meanwhile, often highlight the safety of the cover control, especially with kids in the house. Either way, users overwhelmingly report that the switch to modern disposal units leads to cleaner, fresher-smelling kitchens and fewer clogged pipes.
Feedback on garbage disposal unit installation
Installation reviews are mixed—skilled DIYers enjoy the satisfaction of mounting their new disposal unit, but first-timers often recommend hiring a pro for peace of mind. Positive feedback centers on plug-and-play models with pre-attached power cords, which make the process significantly easier.
Many users appreciate the quick improvement in kitchen workflow once a new disposal is online, reporting fewer drain odors, reduced food waste, and faster post-meal cleanup. Several express relief at never having to wrangle with overstuffed garbage bags again.
Frequently Asked Questions About Garbage Disposals
- Can any sink have a garbage disposal?
- Are garbage disposals safe for septic tanks?
- How do I get rid of foul odors in my disposal unit?
Can any sink have a garbage disposal?
Most sinks can accommodate a garbage disposal with a standard drain opening and sufficient under-sink clearance. Plumbing modifications may be needed for older homes or non-standard sinks.
Are garbage disposals safe for septic tanks?
Many modern disposals are designed to work with septic systems, but always check your manufacturer’s guidelines. Limit heavy use and avoid non-biodegradable waste to maintain septic health.
How do I get rid of foul odors in my disposal unit?
Regular cleaning is key. Run cold water and grind ice or baking soda to scrub interior parts, and follow up with citrus peels for fresh, natural scent. Avoid using bleach, which can harm pipes and disposal components.
Best Practices: Get the Most Out of Your Garbage Disposal
- Don’t overload the disposal unit
- Cut large food waste items into smaller pieces
- Run water before and after use
- Never pour grease into the garbage disposal
Regular, mindful use is the key to a long-lasting, efficient garbage disposal. Avoid overloading the chamber with too much food at once, chop large items for easier grinding, and always let cold water run a few seconds before and after each use. Never dispose of bones, coffee grounds, or fibrous veggies, and avoid dumping grease or oil—these can coat and clog the pipes.
Following these golden rules ensures fewer breakdowns, lower repair costs, and a cleaner, greener kitchen for years to come.
Choosing the Right Garbage Disposal: Your Next Steps
Where to buy quality garbage disposals
Reputable home improvement centers, dedicated appliance stores, and major online retailers all stock a variety of garbage disposal units . Shopping online allows you to compare prices, features, and customer reviews—while many vendors also offer free delivery and bundled installation services. Always verify the seller’s reputation and the included warranty.
How to compare warranties and support
Always check the length and coverage of the warranty, as well as available customer support channels. Top brands like InSinkErator, Moen, and Waste King typically provide robust service networks, online guides, and responsive hotlines. Prioritize models with clear lifetime or multi-year guarantees—and read the fine print for conditions, service fees, and coverage on wear parts and labor.
Also, seek out customer feedback for insights on how a manufacturer handles claims or provides troubleshooting support.
Recap: Making a Smart Choice for Your Garbage Disposal Needs
- Assess your household needs
- Review recommended garbage disposal units
- Compare features, prices, and customer experiences
- Choose a disposal unit that supports sustainability and convenience
Ready to Upgrade Your Kitchen? Find the Best Garbage Disposals Today
"A high-quality garbage disposal is an investment in convenience, cleanliness, and peace of mind."
Take the plunge and upgrade your kitchen with a garbage disposal that fits your space, habits, and values. Shop trusted brands, compare performance, and look for options like free delivery or integrated power cord setups. Transform your cooking experience—one switch, one meal, and one less clog at a time.
To enhance your understanding of garbage disposals, consider exploring the following resources:
-
“Best Garbage Disposal Buying Guide” by Consumer Reports provides comprehensive insights into selecting the right garbage disposal for your home, covering factors like pipe compatibility, septic system considerations, and space requirements. ( consumerreports.org )
-
“The 7 Best Garbage Disposals of 2024” by The Spruce Eats offers detailed reviews of top garbage disposal models, highlighting their features, pros, and cons to assist you in making an informed decision. ( thespruceeats.com )
These resources will equip you with valuable information to choose and maintain a garbage disposal that suits your needs.


Write A Comment