Add Row
Add Element
American Yard and Home Logo
update
American Yard & Home
American Yard & Home Logo
update
Add Element
  • Home
  • Categories
    • Ask an Expert
    • DIY Projects & Repairs
    • Featured Businesses
    • Home Renovation & Remodeling
    • Interior Design & Styling
    • Landscaping & Curb Appeal
    • Outdoor Living
    • Smart Home & Tech
June 28.2025
3 Minutes Read

5 Warning Signs Your Tomato Plant Is Scream For Help and How to Save It

Close-up of a distressed tomato plant with yellowing leaves, highlighting vital tomato care tips.


Signs Your Tomato Plant Needs Immediate Attention

Tomato plants are a staple of home gardening, cherished for their delicious fruit and vibrant foliage. However, even the most seasoned growers encounter challenges that can leave their beloved plants in distress. Recognizing the signs of a struggling tomato plant is crucial for ensuring a lush harvest. Let’s delve into the five common indicators that your tomato plant is desperately seeking help—and how you can revive it.

1. Wilting Leaves: A Cry for Moisture

When temperatures soar, wilting leaves are often the first cry for help. Tomato plants experience wilting due to insufficient water during hot weather, as well as overwatering that leads to soggy soil. The key solution lies in providing a consistent watering schedule tailored to your soil type. Regular water without overdoing it, combined with a layer of compost, can work wonders. Compost not only nourishes the soil but also helps retain moisture, decreasing the frequency of watering needed.

2. Stunted Growth: Nutrient Deficiencies at Play

If your tomato plants fail to grow, it may be due to a lack of essential nutrients. Stunted growth can result from imbalanced soil pH or nutrient depletion. Conducting a soil test can unveil what your plants truly need. Applying a balanced fertilizer, along with regular feedings during the growing season, can help rejuvenate your plants. You’d be surprised how a little soil management can lead to skyrocketing growth.

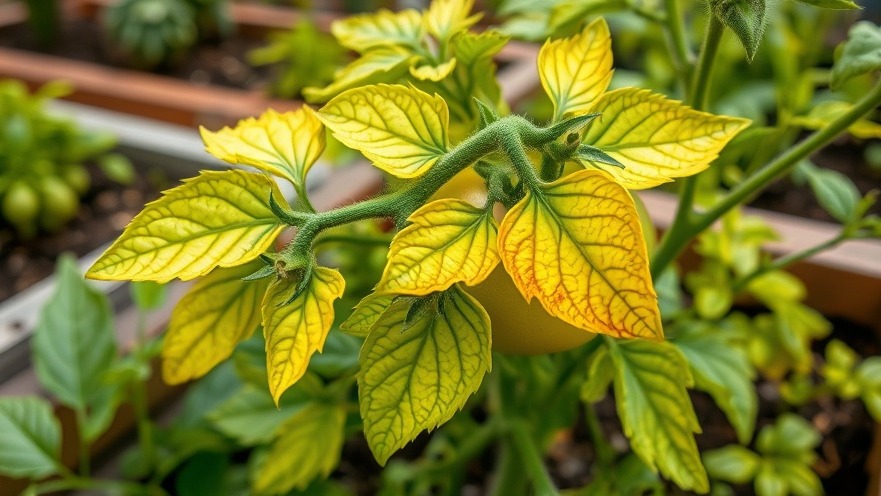
3. Yellowing Leaves: The Sign of Stress

Yellow leaves can signify various issues, from nutrient deficiencies to pests and diseases. If lower leaves are yellowing, they may simply be aging and should be trimmed. However, if this symptom affects the entire plant, check for pest damage or overwatering. Effective pest control methods, including companion planting and organic sprays, can enhance your plants’ health while promoting a thriving garden ecosystem.

4. Blossom Drop: Frustrating Even the Best Gardeners

Experiencing blossom drop? This problem arises when tomato plants face stress—be it from extreme heat, drought, or poor pollination. To combat this, ensure your plants receive consistent moisture and consider hand-pollinating blossoms in a humid environment. By providing support through careful watering and managing the environment, you can encourage blossoms to set fruit!

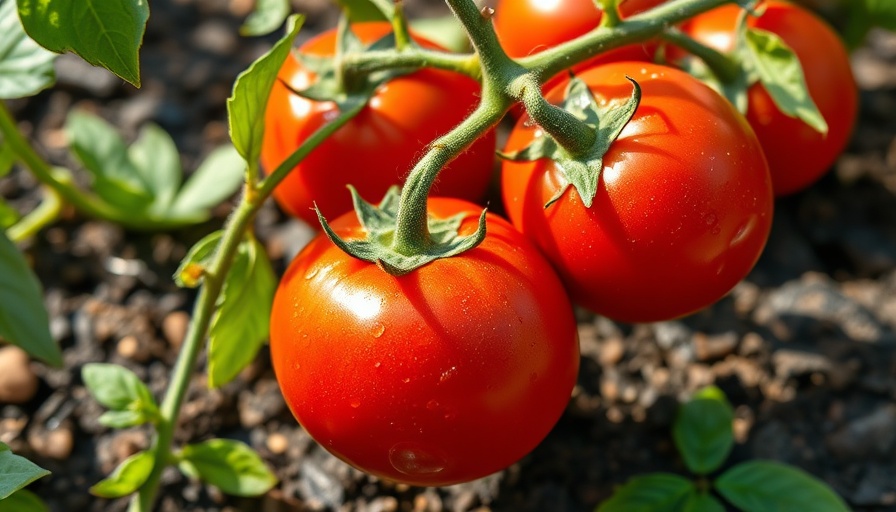
5. Cracking Skin: Check for Water Fluctuations

Lastly, cracked tomatoes are often a result of inconsistent watering. When your tomato plant receives a surge of water after a dry spell, the rapid absorption causes the fruit to expand faster than the skin can adjust. To prevent this, maintain a steady watering schedule and use mulch to regulate moisture levels in the soil. A layer of mulch not only hydrates but can enhance the overall aesthetic of your garden! Just imagine picturesque rows of juicy, unblemished tomatoes.

Conclusion: Act Quickly for a Prolific Harvest

As summer continues, the joy of growing tomatoes includes staying vigilant in addressing their needs. Recognizing the signs and offering timely interventions not only saves your plants but rewards you with a bountiful harvest. Don’t wait for the problems to escalate—act promptly to ensure your tomato plants thrive all season! If you're looking to enhance your gardening experience, consider the benefits of container gardening or even explore garden planning tips tailored to your outdoor space.


Outdoor Living

Write A Comment

*
*
Related Posts All Posts
08.13.2025

Mastering Quinoa Harvesting: Secrets for Backyard Gardeners

Update Quinoa: The Superfood of Your Backyard Garden Quinoa has become synonymous with health consciousness and outdoor gardening. This pseudograin, celebrated for its complete protein profile, is increasingly finding its way into home gardens. If you're keen to add this versatile plant to your outdoor living space, knowing how and when to harvest quinoa is crucial for maximizing your yield. Understanding Quinoa's Growing Needs Before diving into how to harvest quinoa, it's essential to understand its unique requirements. Quinoa prefers cool, sunny summers, which mimic its native conditions in the Andes Mountains of South America. Outdoor gardening enthusiasts in regions like the Pacific Northwest and Northern Mountain States will find it particularly rewarding. A few watering tips? Quinoa is relatively drought-tolerant but thrives in well-drained soil. If your yard suffers from drainage issues, consider raised garden beds or container gardening to ensure your quinoa flourishes. Timing is Everything: When to Harvest Quinoa As fall approaches, gardeners should keep a close eye on their quinoa crops. Most varieties take between 90 to 120 days to reach maturity. The plants typically reach about three feet in height and produce colorful fruits that swell as the seeds ripen inside. The key indicators for harvesting are: Monitor the fruits – once they begin to wither and change color, it's time to act. Wait for dry weather – this helps prevent mold due to cool fall rains. Cover the fruits with mesh to protect from eager birds. By monitoring these signs, you can harvest your quinoa just before mold takes hold, ensuring the seeds remain healthy and nutritious. Harvesting Techniques: Getting It Right Once the quinoa is ripe, the technique you use for harvesting can dramatically affect your yield. To harvest properly, follow these steps: Using scissors or garden shears, cut the flowering stalks while avoiding excessive shaking. This ensures minimal seed loss. Gather the stalks gently and place them in a basket or bag. After cutting, allow the harvested quinoa to dry in a warm area for a few days. Implementing these tips will minimize seed loss and ensure you're maximizing your backyard harvest. Staying prepared with container gardening tools can simplify the process! Securing Your Quinoa from Wildlife Gardening isn't just about planting; it's also about protecting your yield. One way to safeguard your quinoa from birds and small mammals is by installing garden netting. This simple barrier keeps pests at bay while allowing sunlight and rain to reach your plants. Additionally, consider creating a better environment in your garden by implementing yard drainage solutions. These measures can further enhance the health of your quinoa and other crops. Recipe Ideas: Enjoying Your Harvest Once you've harvested your quinoa, you're likely wondering how to best enjoy it. Here are some tried-and-true recipes that underscore its versatility: Quinoa Salad: Combine cooked quinoa with fresh veggies, nuts, and a zesty dressing for a refreshing meal. Quinoa Bowl: Layer quinoa with proteins such as grilled chicken or chickpeas and top with avocado and salsa. Quinoa Stir-fry: Toss cooked quinoa with your favorite stir-fried vegetables for a nutritious quick dinner. These recipes not only make the most of your harvest but also highlight quinoa’s important role in healthy eating. Final Thoughts on Your Quinoa Crop Harvesting quinoa can be an incredibly rewarding experience, both for your well-being and your culinary projects. As you implement your garden planning tips, consider the heartwarming stories and satisfaction that comes from growing your food. With the right strategies and timing, your home garden can thrive, beautifying your outdoor space in the process. For those eager gardeners out there, why not take this opportunity to engage even more with your outdoor living? Think about backyard makeover ideas that can enrich your gardening experience. Dive into the world of outdoor cooking with outdoor kitchen designs to integrate natural and fresh flavors from your harvest into your meals. It's not just about growing quinoa; it’s about cultivating a lifestyle rich in health, sustainability, and community bonding.

08.12.2025

Discover How to Plant and Care For Fan Aloe in Your Garden

Update Unlocking the Beauty of Fan Aloe: A Creative Touch for Your Garden Fans of succulents, rejoice! If you're looking for a way to add texture and unique flair to your outdoor space, the fan aloe (Kumara plicatilis) is a stellar addition. This evergreen succulent shrub, known for its captivating rosette of fleshy leaves that shimmer in blueish-green tones and its striking shape, can transform any garden into a stunning showcase. Derived from South Africa, the fan aloe thrives in warm climates and is not only visually pleasing but also a low-maintenance choice for those committed to eco-friendly yard care. Why Fan Aloe Stands Out At first glance, fan aloe might be mistaken for a traditional aloe due to its thick, succulent leaves. Unlike its famous relative, its unique structure resembles a fan, hence the name. The visual appeal is enhanced by the occasional serrated edges and white spots on its foliage, making it a significant addition for backyard makeover ideas. Moreover, its drought-resilient characteristics promote sustainability, allowing you to conserve water while still enjoying the beauty of your landscape. Choosing the Right Spot for Your Fan Aloe For optimal growth, placing your fan aloe in a location where it receives full sun throughout the day is essential. These plants thrive best when basking in bright sunlight, which encourages vibrant foliage and successful blooming. If you're considering integrating it into your garden planning, remember that a well-drained soil mix will help avoid root rot, especially in areas with poor yard drainage solutions. Caring for Your Fan Aloe: Essential Tips Taking care of your fan aloe requires minimal effort, making it perfect for busy gardeners or those new to plant care: Watering: Allow the soil to dry completely between waterings. Overwatering can lead to issues such as root rot. Soil Type: Use a cactus or succulent mix to ensure proper drainage. You may also want to incorporate some sand into your soil for additional drainage. Fertilizing: Apply a balanced fertilizer during the growing season to promote growth and blooming. Creative Design Ideas with Fan Aloe The versatility of fan aloe extends beyond its beauty; it can also be creatively integrated into designs such as container gardening arrangements or as a stunning anchor point for fire pit designs. Imagine a tranquil backyard oasis featuring soft lighting from landscape lighting ideas, surrounded by tall fan aloes defining the pathways. Or use raised garden beds to lift these beauties into your view while integrating other annuals that glisten in the warm sun. Your Community and Gardening: The Heart of Neighborhoods As you nurture your fan aloe, consider reaching out to your local gardening community. Whether through neighborhood gardening clubs or online forums, sharing your experiences can foster connection. Invite a neighbor over for a fun afternoon of planting, and share tips about creating inviting spaces that can enhance outdoor living experiences. This collaborative spirit can enliven your community while introducing creative outdoor kitchen designs or enlightening yet practical mulching tips. Conclusion: Embrace the Charm of the Fan Aloe Transform your garden with the unique elegance of the fan aloe. By incorporating this captivating plant into your landscape, you can create a focal point that showcases your style while maintaining simplicity in care. Now is the time to think about adding this resilient beauty to your garden plans. Let's embrace the opportunity to cultivate joy and beauty together right in our backyards!

08.11.2025

Mastering Tomato Growth in Humid Climates: Essential Tips

Update Tomatoes: The Crown Jewel of Summer Gardens There's something truly magical about growing tomatoes in your backyard. For many, these vibrant fruits represent the essence of summer, offering flavor that cannot be rivaled by store-bought varieties. However, gardening enthusiasts living in hot and humid climates often face unique challenges when it comes to nurturing these beloved plants. With the risk of blossom drop, disease pressure, and stagnant airflow, summertime can feel daunting. Yet, with a little knowledge and strategic planning, successful tomato cultivation is within reach! Understanding the Temperature & Humidity Factors Tomatoes thrive in warmth but can become temperamental when faced with excessive heat and humidity. When temperatures soar above 85°F (29°C), especially during nights hovering above 70°F (21°C), the likelihood of blossom drop increases, meaning fewer fruits. This challenge was once confined mainly to the southern regions of the United States, but as climate change reshapes our weather patterns, gardeners everywhere are grappling with this issue. 1. Timing is Everything: Early Planting One of the best strategies to combat the negative effects of humidity during the growing season is to plant tomatoes early. Consider starting your transplants in early May. This timing allows the plants to take root before the oppressive heat kicks in. Alternatively, gardeners could also choose to replant during late July or early August. This late season strategy takes advantage of cooler nights and the potential for a healthy second harvest—minus the diseases that plagued earlier crops. 2. The Importance of Trellising Proper trellising is pivotal for tomato plants, particularly in hot, humid climates. Elevating the plants not only makes harvesting more accessible but also significantly improves air circulation. Good airflow helps to prevent moisture accumulation on the leaves, reducing the likelihood of fungal diseases that flourish in humidity. Creating a sturdy trellis is an investment in your plants’ health, so take the time to implement this vital gardening practice! 3. Effective Watering Strategies Watering may seem straightforward, but in hot and humid conditions, it requires strategic planning. The goal is to keep the soil consistently moist without overwhelming the plants. Use drip irrigation systems or soaker hoses to ensure even distribution of water directly to the roots while minimizing evaporation. Watering in the morning allows plants to absorb moisture before the heat of the day causes rapid evaporation. 4. Embrace Companion Planting Companion planting can be a game-changer. Certain plants, like marigolds, can deter pests, while herbs like basil can boost the health of tomato plants. Planting flowers among your tomatoes not only looks beautiful but can also attract beneficial insects that help with pollination and pest management. With a bountiful garden, the benefits extend beyond just tomatoes. 5. Protect and Cover When faced with extreme weather, utilizing row covers or shade cloth can provide much-needed protection. These coverings shield young transplants from scorching afternoons while allowing sunlight to filter through. Similarly, employing mulch around the base of your tomato plants can conserve soil moisture, keep the roots cool, and reduce weed competition. 6. Fertilization Focus: Understanding Your Soil To maintain healthy, productive plants, it's essential to consider soil health. Testing your soil before planting can guide you in choosing the right fertilizers for your tomatoes. Opting for organic options like compost or well-rotted manure not only nourishes the plants but also contributes to the overall health of your garden’s ecosystem. 7. Pest Management: Keeping the Garden Healthy In humid environments, pests can become particularly problematic. Regularly checking for signs of aphids, hornworms, and whiteflies can help you catch infestations early. Employing integrated pest management (IPM) techniques, such as using natural predators or organic sprays, can keep your crop thriving without harsh chemicals. Conclusion: Embracing Your Gardening Journey With thoughtful planning and proactive gardening techniques, growing tomatoes in hot and humid conditions can be successful and fulfilling. Together, let's make our gardens thrive, ensuring delicious, homegrown tomatoes find their way to our tables. Don't wait to implement these tips to revolutionize your gardening experience and share the joy of homegrown produce with family and friends! Think your garden needs a makeover? Explore innovative backyard makeover ideas, incorporate different outdoor kitchen designs, or check out our seasonal planting guide for planning your next garden adventure!

Terms of Service

Privacy Policy

Core Modal Title

Sorry, no results found

You Might Find These Articles Interesting

T
Please Check Your Email
We Will Be Following Up Shortly
*
*
*