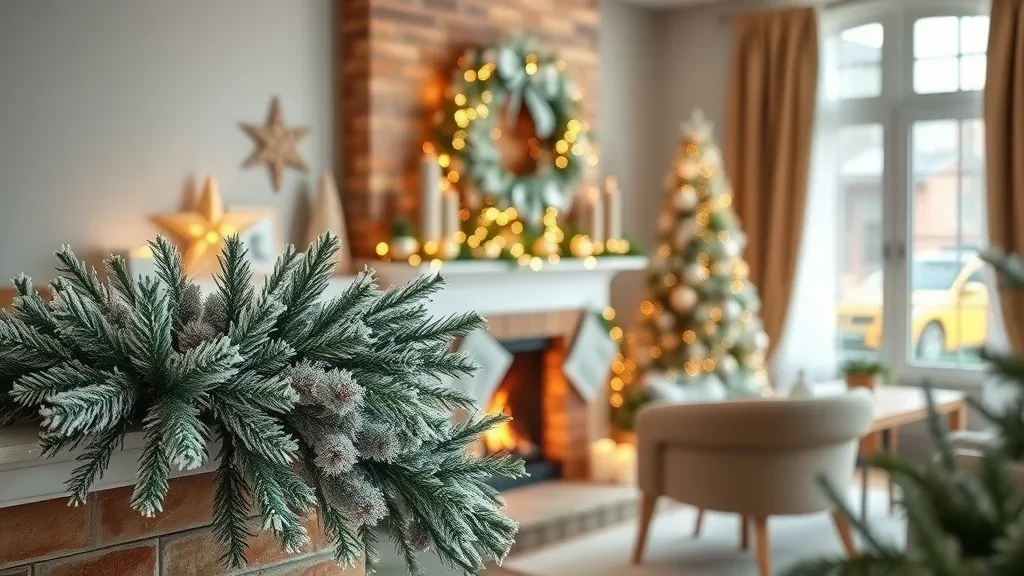
Did you know that social media DIY trends for faux frost have surged 300% this holiday season? If you’re scrolling through Instagram or TikTok, chances are you've seen gorgeous, sparkly greenery draped over mantels and interwoven into wreaths—crafted not in expensive studios, but in everyday living rooms with a clever two-ingredient hack. Curious how to capture this viral magic for your own holiday decor? You’re about to discover the simple secret fueling the internet’s most dazzling holiday trend: DIY faux frost greenery that looks luxe, lasts all season, and is completely customizable. Whether you’re a seasoned crafter or a holiday enthusiast, this guide will teach you everything from supplies to expert styling tips, ensuring your décor sparkles with festive flair."Did you know that social media DIY trends for faux frost have surged 300% this holiday season?"Transforming Holiday Decor: The DIY Faux Frost Greenery CrazeThe landscape of holiday decor is rapidly changing, thanks to a creative and accessible trend: DIY faux frost greenery. Across social media, crafters and home stylists are showcasing their take on frosted pine branches, shimmering garlands, and crystallized wreaths. What sets this movement apart is its do-it-yourself nature, offering an affordable, authentic-looking alternative to pricey store-bought decorations. This approach not only allows you to personalize your space with unique, textured arrangements that add depth and sparkle but also makes it easier to adapt to evolving trends—without breaking the bank. Imagine being able to adjust the intensity of the frost, choose the shimmer of your choice, and create centerpieces for your holiday wreath or dining table that express your unique style.This surge in creativity is also a response to the push for sustainability and reuse. Many opt for reusable faux greenery as a base, giving them the freedom to refresh or update their decor annually, all while keeping costs and environmental impact low. Whether you’re transforming pine branches into icy works of art for garlands you hang or laying shimmering sprigs across the top of your mantle, the DIY faux frost method puts you in control—no specialized skills required. With this guide, you’ll get step-by-step instructions, essential supply checklists, pro secrets for achieving the most realistic faux frost finish, and safety guidelines so your projects are not just beautiful, but also safe for children and pets.What You'll Learn About DIY Faux Frost GreeneryHow to craft realistic diy faux frost greenery with two simple, inexpensive ingredientsProven techniques to add texture and depth to faux frost arrangementsExpert insights on the best products and applications for holiday decorCreative styling ideas and professional secrets for flawless resultsThe Best Two-Ingredient DIY Faux Frost Greenery MethodWhen it comes to achieving that magical, dewy winter look, the internet’s favorite two-ingredient method reigns supreme. The real beauty of this diy faux frost greenery trick is its simplicity: just Epsom salts or coarse glitter for the icy texture, and a clear-drying craft glue or spray adhesive to keep your frost securely in place. Whether you want to frost pine branches for a holiday wreath or give your tabletop centerpieces a glistening touch, you’ll find this approach both effective and budget-friendly. With these everyday items in hand, you’ll be set to create jaw-dropping, customizable decor that far surpasses what you’ll find on store shelves. Let’s unpack the essentials and walk through the simple steps to bring a winter wonderland vibe into any room.Essential Supplies for Faux Frost and Holiday DecorIngredient 1: Epsom salts or coarse glitterIngredient 2: Clear-drying craft glue or spray adhesiveOptional supplies: Faux greenery, paintbrushes, protective glovesStep-by-Step Tutorial: How to Make DIY Faux Frost GreeneryPrepare your workspace for easy cleanup. Lay down newspaper or a disposable tablecloth to catch stray salts or glitter. Make sure your supplies are within reach and set up in a well-lit area so you can see all the details.Apply adhesive generously to your selected faux greenery. Use a paintbrush for even, detailed coverage, especially around leaf edges and branch tips where natural frost tends to gather. Spray adhesive can speed things up for larger branches or garlands you hang along banisters.Sprinkle the faux frost mixture (Epsom salts or glitter) evenly to add texture. Hold the greenery over a tray, then gently sprinkle your chosen frost material, rotating the branch for a natural, random look that mimics real snowflakes before dipping.Let pieces dry thoroughly, then shake off any excess. Allow at least 1–2 hours, longer if you’ve used thicker glue. Hold your frosted item upside down and gently tap to remove loose crystals, ensuring the result looks like authentic, crystalized greenery and not overly clumped.Style directly into your holiday decor arrangements. Simply lift the dowel or branch and integrate into wreaths, centerpieces, or garlands for an instant wintry ambiance—perfect for christmas decorations to bring your space to life.Table: DIY Faux Frost Greenery Tools and AlternativesRequired ItemWhy It WorksPossible SubstitutesEpsom saltsCreates icy, crystalline effectCoarse sugar, clear glitterClear glueAdheres frost securelyMod Podge, spray adhesiveFaux greeneryRealistic baseReal branches (with caution)PaintbrushPrecise applicationFoam brush, fingersExpert Insight: Why DIY Faux Frost Outshines Store-Bought OptionsAccording to home decor specialists, nothing compares to the handcrafted touch in diy faux frost greenery. Not only does it look more natural and integrate seamlessly with your unique holiday decor, but it also empowers you to add texture, dial up (or down) the shimmer, and experiment with sparkle intensity to fit your style. Plus, making your own pieces is a perfect way to create lasting memories and traditions with family and friends, and offers the satisfaction of knowing you crafted something truly your own. Bonus: You’re able to control the safety and quality of materials, avoiding questionable chemicals sometimes found in mass-produced decorations. Whether you lean toward subtle, snowy touches or crave full-on, glitzy glamour, this technique lets you custom-blend results tailored precisely to your taste and home aesthetic."Handmade diy faux frost greenery not only looks more authentic, but allows you to tailor texture and shimmer intensity exactly how you want it." – Amanda Lee, Interior Styling SpecialistChoosing the Best Greenery for DIY Faux Frost ProjectsPopular faux plants: pine, eucalyptus, boxwoodHow to select greenery for maximum realism and longevityWhile pine branches may be the classic choice for frosted holiday decor, don’t overlook other faux foliage options such as eucalyptus or boxwood. Each plant offers unique shapes and leaf textures, allowing you to create arrangements that pop with visual contrast and realism. When selecting greenery for diy faux frost greenery projects, prioritize branches with sturdy stems and flexible leaves, as these hold adhesive and salts or glitter more effectively. Realistic detailing in faux greenery, such as subtle green variations and natural leaf veining, enhances the final frosted look, making it nearly impossible to distinguish from nature’s own handiwork—from garlands you hang on staircases to ornaments or hanging decor for your front door. Opt for high-quality faux materials to ensure your projects last from year to year, minimizing the need for frequent replacements and reducing waste compared to disposable, single-season decorations.Watch our short, step-by-step video for a clear visual guide to crafting your own diy faux frost greenery—supplies, technique, and expert styling tips included. Bright holiday setting and engaging pacing make this the perfect visual companion!Creative Ways to Use DIY Faux Frost Greenery in Holiday DecorWreaths and swags for doors and mantelsCenterpieces and tabletop arrangementsFestive garlands for staircases and banistersOutdoor planters for a wintry touchThe applications for diy faux frost greenery in holiday decor are truly endless. A frosted pine wreath or festive swag can instantly transform your front door or living room mantel into a winter wonderland. For a cozy dining table, design lush, frosted centerpieces that glimmer in candlelight, making every meal feel like a special occasion. Draping frosted garlands on banisters or open shelving adds elegant, snowy charm, especially when paired with metallic ornaments or soft twinkling lights. Don’t hesitate to extend your creativity outdoors: Arrange frosted branches in porch planters or along windowsills for curb appeal that’s both sophisticated and inviting. Each project presents an opportunity to showcase your personal style and spread festive cheer—all while controlling the color, texture, and placement of your faux frost.Safety Tips When Crafting DIY Faux Frost GreeneryMake sure to use non-toxic ingredients for indoor use.Work in a ventilated space if using spray adhesives.Keep faux frost greenery away from open flames or heat sources.Safety matters, especially when creating decorations that may be touched by children and pets or displayed near heat. Choose adhesive products and “frost” ingredients labeled as non-toxic to reduce the risk of accidental ingestion or allergic reactions. Always craft in a well-ventilated room when using spray adhesives, and consider wearing gloves to protect your skin from irritation. For households with small kids, avoid areas where food will be served and keep diy faux frost greenery out of reach to avoid accidentally ingesting any materials. Finally, since many adhesives and decorative elements are flammable, never position your frosted creations near candles, open flames, or heating vents—this care using these frosted pieces keeps the season safe and festive for everyone.How to Create Fake Frost?Creating fake frost is simple with the right ingredients: Epsom salts or coarse glitter for natural sparkle, plus clear-drying glue or spray adhesive for secure, even coverage. Just brush adhesive over your chosen greenery, sprinkle on your sparkling frost, and allow it to dry before using. For extra realism, blend a sprinkle of clear glitter with your salts or add tiny hints of light blue dye to mimic the blue glint of real ice—just remember: a little goes a long way. This technique is quick and easy and doesn’t require hot water, a borax solution, or any complicated steps—perfect for anyone from beginners to seasoned crafters looking to make the frost in under an hour.How to Frost Artificial Leaves?For the most lifelike, frosted effect on artificial leaves, use a paintbrush to coat edges and surfaces with a thin layer of clear glue or Mod Podge. While still sticky, softly dust with Epsom salts or a mixture of clear glitter, focusing on spots where snowflakes or frost would naturally form. Gently shake to remove extra material after drying. This is especially effective for eucalyptus and boxwood, where the texture and contour allow you to add texture and shimmer that’s easily customized, whether you prefer a heavy snowy look, or a subtle, glistening accent that will eventually fall gracefully for cleanup at season’s end.How to Make Icy Branches?Transforming branches into icy decor is a fun and accessible holiday project. For faux or real branches, lightly brush clear glue along each twig, making sure to cover the tips where frost typically collects. Generously sprinkle Epsom salts or clear glitter for a crystalized, frosty look. Let dry completely, then tap off the excess. For added dimension, try temporarily dipping your branches into a borax solution—this will form larger, striking crystals that catch light for true wintry magic. Whether you want to shape small twigs into standalone ornaments or incorporate icy branches into large centerpieces for your holiday table, this method offers the perfect way to create festive, custom decor.How to Make Fake Snow for Outdoor Decorations?Creating safe, realistic fake snow for outdoor use calls for durability. Mix Epsom salts and coarse sugar—this combination withstands moisture and can be easily cleaned up. Adhere the mixture to faux greenery or outdoor-safe branches with a robust outdoor adhesive, ensuring it can handle the elements. If you need bulk quantity for large displays or planters, look for biodegradable snow alternatives at craft stores. Always keep away from real fruit or greenery where children and pets might have access, and avoid placing near entryways where slipping could occur. The results? Outdoor displays with wintry elegance and minimal environmental impact.FAQs: DIY Faux Frost GreeneryWill faux frost greenery last year to year?Yes! If stored in a cool, dry place and handled gently, most faux frost decorations will last multiple seasons. To prolong life, store each piece in a protective container to avoid crushing and periodically refresh any frost or glitter that might wear off.Are the materials pet and child safe?When you use non-toxic glue and salts or craft glitter, the method is generally safe for homes with children and pets. However, always display out of reach and avoid using in areas where food will be served. Supervise any craft activities with younger kids.Can I use this method on real plants?While the focus is on faux greenery, you can frost real branches if you avoid harsh adhesives that could damage the plant. Real branches are best for short-term display only, as organic material will eventually fall or degrade.What is the best base for diy faux frost greenery?Durably constructed faux greenery—especially pine, eucalyptus, or boxwood—offers the best base for longevity and realism. Choose stems with varied shades and natural veining for the most life-like results.Learn what to avoid! See the five most common mistakes crafters make with faux frost—from overapplication to incorrect glue use—and how to fix them for flawless results.Key Takeaways: Mastering the DIY Faux Frost Greenery TrendDIY faux frost greenery is simple, affordable, and fully customizable.The two-ingredient trick delivers stunning, realistic results.With the right materials, you can transform any holiday decor with effortless elegance.Elevate Your Holiday Decor—Share Your DIY Faux Frost Greenery CreationsReady to transform your home with festive sparkle and handmade charm? Try out these tips, and don’t forget to share your diy faux frost greenery ideas and results on social media to inspire fellow holiday decorators.To enhance your DIY faux frost greenery projects, consider exploring the following resources:“This DIY Faux Frost Is the Easiest Holiday Decor Hack (It’s Just Two Ingredients!)” offers a straightforward method using Borax to create realistic frosted effects on various decorations. (shopping.yahoo.com)“DIY Frosted Greenery Floral Arrangement” provides a step-by-step guide to crafting elegant frosted floral displays, complete with a video tutorial for visual learners. (bloomsbythebox.com)
 Add Row
  Add
Add 


Write A Comment